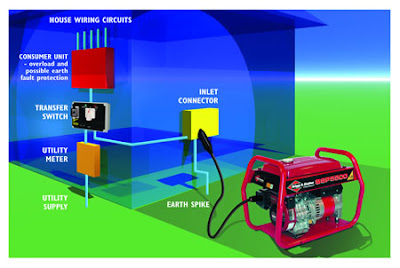
How to Install a Portable Generator Transfer Switch
Tools and Materials
- Generator
- Extension cord
- Breaker box
- Transfer switch panel
- 10/4 cable
- New breakers
Step 1 - Size of Generator
Before installing a portable generator transfer switch you need to know what size of generator to buy. How much do you really need to run during a power outage? Look at the wattage of the appliances and buy a generator that allows for a comfortable margin above this to accommodate spikes.
Step 2 - New Panel
Shut off power to the main breaker box and take off the cover. Remember that the main disconnect terminal will still be hot so avoid approaching it. You’ll see a circle in the side of the box. Knock this out and put in a threaded nipple. At the other end of the nipple attach the new box. Use heavy screws to anchor the new box to the wall. Now attach the grounding bus to the wall of the new panel.
Step 3 - Wiring
You need to remove the black wire from each of the breakers which has a circuit you want to power with the generator. Use an insulated screwdriver for this. After this, remove the breaker from the panel and remove the white and green wires. Tape all three wires for each circuit together.
Strip the sheathing from 10/4 cable and feed it through the conduit between the two boxes. Connect the white and green wires to the appropriate buses in the main panel. Now attach the red and black wires from the 10/4 cable to a breaker that’s 30 am and 240 volt and press it into place in the main panel. Repeat the connections in the transfer panel switch panel. Once you have the hot wires connected to a breaker and installed you have power to the side panel.
Step 4 - Circuits
You’ll need to extend the wires from the circuits you’ve disconnected to bring them into the portable generator transfer switch panel. Depending upon the local code, you might be able to use wire connectors for this purpose. Having done this, bring the wires through the conduit. Attach the white wire to the neutral bus, the green wire to the ground bus, and the black wire to the breaker.
Step 5 - Outlet
To set up an outlet for the portable generator to plug into within the power generator transfer switch, you’ll need more 10/4 cable. Connect to the receptacle for the generator. In the breaker box attach the white and green wires to their respective buses and attach the black wire to a free 240 volt breaker.
Source: DoItYourself.com®
Source: DoItYourself.com®

