Portable Generator Transfer Switch: Design and Installation
TRANSFER SWITCH BASICS
What is a transfer switch as used with a standby generator and your home? Well, the simple answer is that it isolates the generator from the home’s electric utility service and vice versa. Without a transfer switch, the only way to tie a generator into your home’s electrical system is to perform the very dangerous and likely illegal act of “backfeeding”.
Back feeding is done by connecting the output of your generator to your home’s electrical system, typically by plugging into a receptacle. This is dangerous for several reasons. The first reason that this is unacceptable is that, with a large enough generator, can likely overload the circuit that you are back feeding through resulting in damage, fire or injury. Another reason that one must be mindful of the dangers of back feeding is the simple fact that you can energize not only your entire house, but your neighborhood and even primary service lines. It is important to note that when you back feed, the same transformer that reduces line voltages to your household voltages can work in reverse. That is, your 120 volts put out by your generator can be stepped up to line voltage back feeding through a transformer. You could imagine how dangerous this can be for utility workers repairing downed lines, damaged equipment, etc.
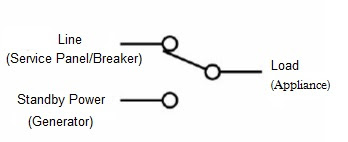
The basic function of a transfer switch in a standby generator system is to isolate two separate feed sources for a load(s) from each other, preventing any chance of one power system feeding the other and vice versa. The following graphic illustrates a basic schematic of a single transfer switch. The illustrated switch is a single pole, double throw (SPDT) type. A common example of a SPDT switch is a three-way switch found in the home. As drawn, the load/appliance is connected to the electric service of the building and/or residence. The generator supply in this example is isolated from the load and the electric service.
When the transfer switch is actuated/switched, the connection between the electric service/line power will “break” and then the switch will “make” the connection between the load and the generator. Note the terms “make” and “break” for these are important. It is possible to have two different types of SPDT switches: make before break and break before make. A make before break switch will actually have a brief period of time during switching where both the line power and the generator will be connected. The break before make switch, the common type, theoretically should never allow the connection of the two power sources. Obviously, this is the type of switch that we need. The three-way switch mentioned earlier is typically this type of SPDT switch.
There are several companies that manufacture and sell preassembled transfer switches, basically, off-the-shelf solutions. Two of these companies are GenTran and Reliance Controls.
For what these switches are, sets of SPDT switches and some push button breakers (for the basic manual options), We have yet to meet anyone that thought these were a bargain. Based on our needs and what is available on the market, we opted to design and install a much more economical, custom matched to our needs and just as safe for property and life transfer switch system.
TRANSFER SWITCH DESIGN & INSTALLATION
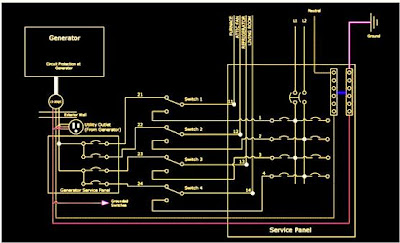
The above figure illustrates the transfer switch design. Some important safety oriented characteristics to note regarding this design:
1. Note that all boxes, grounded receptacles and grounded switches are bonded to the generator’s ground and in turn bonded to the ground bus at the electric service panel for your house.
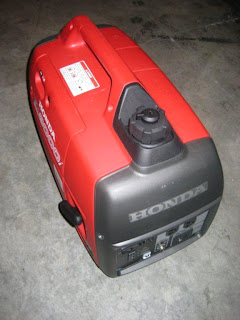
2. The neutral from the generator is bonded to the neutral bus of the service panel which, in turn, is bonded to the ground bus of the service panel. Note: portable generator like Honda Eu2000i does not have a neutral bonded to ground at its feed points.
3. In this particular example, you do NOT want to bond the neutral and ground at the generator, Honda Eu2000i, if you are bonding the neutral and ground buses at the service panel. Some generators come from the factory with a neutral to ground bond, but that is not so in our case. In our example, if we were to bond the neutral and ground at our generator and have the neutral grounded at the panel, we now have two different paths for return current to flow to our generator. Return current on the ground will create voltage on the ground and that is NOT good. For now, you theoretically have an “energized” ground and this is both a life safety and property concern.
4. All circuits being dual served are 15 amp in size in the main service panel. While the generator has 20 amp circuit protection, this is too much for your home’s 15 amp branch circuit wiring. So, we would be able to overload a 15 amp branch circuit with 19.9 amps and never trip the generator circuit protection out. Also, keep in mind that 15.1 amps will not instantaneously trip a 15 amp breaker. As a matter of fact, 15 amps on a 15 amp protected circuit could take minutes or longer before tripping. It is also important to note that a 20 amp breaker will not trip as fast with higher currents as what a 15 amp breaker would.
All of these concerns/issues could be major fire safety hazards. To prevent any issues, each transfer switch’s generator side line is protected by a 15 amp breaker (All of the 15 amp circuits utilize 14/2 W/ Ground wiring).
5. The feed cable (12/2 W/ Ground) from the L5-20R receptacle (where the generator is hooked up outside) and the receptacle itself are sized to accommodate the 20 amp protected circuit provided by the generator as is the utility receptacle.
6. The transfer switches are 20 Amp models with Heavy Duty Contacts to prevent welded or sticking contacts in order to meet the break before make requirement as mentioned above.
The basic “flow” of the system is as follows:
Generator > Service Cable > Twist-Lock Receptacle > Split to Utility Outlet & Generator 2 Breaker, 4 Circuit Load Center > Transfer Switch > Load (e.g. Appliance)
The materials list is as follows:
Outdoor Receptacle
· L5-20I Flanged Insert Receptacle
· Outdoor, Deep Receptacle Box
· Hubbell Flanged Insert Outdoor Receptacle Box Cover
· Vinyl Siding J-Block
Generator Load Center
· Cutler-Hammer 2 Breaker, 4 Circuit Load Center (Cutler-Hammer to match existing service panel)
· Cutler-Hammer Twin 15/15 Amp BR Breakers
Utility Outlet
· Single Metal Box
· 20 Amp 120V Duplex Receptacle
· Duplex Receptacle Cover
Transfer Switches
· 20 Amp Heavy Duty Three-Way SPDT Switches
· Double Metal Boxes
· Double Switch Covers
Miscellaneous: Wiring, Conduit, Etc.
· 12/2 W/ Ground
· 14/2 W/ Ground
· 3/4” EMT Conduit
· 3/4” Conduit Clamps
· 3/4” Conduit Setscrew Connectors
· Wire Nuts & Electrical Tape
At a minimum, your design, layout and installation must comply with the currentrevision of the National Electrical Code (NEC).


